A tiny Transmission.app hack

(A post every 10 months. I hope that does not annoy you :) It will not take long to read, anyway. )

Transmission is a great BitTorrent client. It is full of features (look at the site!), including bandwidth control, and runs on every platform (Linux and Mac :P).
You can choose global upload and download speeds, or shape single torrents among those you are working with.
At home I have a 10mbit connection to the Internet so I rarely limit the torrents, but most of the time when I do it is to reserve a small quantity of bandwidth for Internet browsing while I wait, or to play online.

Transmission is a bit rigid regarding the possible speeds: the only possible values (for both upload and download) expressed in kilobytes/sec are 5, 10, 20, 30, 40, 50, 75, 100, 150, 200, 250, 500, 750, 1000, 1500, 2000. My home network chokes around 600. I could set for 500k, but where’s the fun?

So:

  • head to https://trac.transmissionbt.com/wiki/Building and read thoroughly [the part specifying that you need to have XCode installed, for example]
  • learn that “Building the project on Mac requires the source to be retrieved from SVN. Pre-packaged source code will not compile.
  • download the SVN code (uhm, yes. I also have pkgsrc installed):
    svn co svn://svn.transmissionbt.com/Transmission/trunk Transmission
    in my case the version number was 2.11 1133-something.
  • run a “dry” compile run — this will guarantee that the code is not broken before you start tinkering with it or that you have some local issue (my first time doing actually something with XCode. Easier than I thought, the source has an XCode project file)
  • find the relevant source files (grep was my friend). In the end I only modified Controller.m and TorrentTableView.m: find the line
    const NSInteger speedLimitActionValue[] = { 5, 10, 20, 30, 40, 50, 75,
    100, 150, 200, 250, 500, 750, 1000, 1500, 2000, -1 };

    and modify it to match the speeds you want to be able to use. You can add or remove values as you like as long as the syntax is right.
  • compile it again and run it. :)

If I were a programmer, I’d have implemented something that would allow the user to choose the speed as he liked — but this fits my needs.
Snow Leopard Trash, again

At first I did not notice, but emptying the trash took ages, even “not securely”.
Well, being the geek I am I did a quick dtruss on the Locum process, which spit out a huge list of write_nocancel syscalls. So, it seems it was actually writing stuff over the files I asked him to delete, even if I never asked him to (I just did a right click on the Trash icon, and selected “Empty Trash”). WTF?

Well, I learned (thanks Google) that Snow Leopard does a secure erase of the trash by default. Annoying.
And that I did not realize that until now. Embarassing.

So, this can be solved at least in two ways:

The GUI one
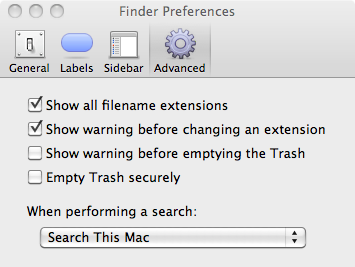
Go into Finder preferences, Advanced, and uncheck “Empty Trash securely”

Finder Preferences Window

or

the CLI one
Go into ~/Library/Preferences, convert the Finder preferences to xml (it’s binary by default)
plutil -convert xml1 com.apple.finder.plist
and change the stanza

<key>EmptyTrashSecurely</key>
<true/>

to
<key>EmptyTrashSecurely</key>
<false/>

Verbosely emptying the trash

Like it happens on Windows, when you decide to delete something OSX simply moves that file or directory to “the Trash”, which is just a hidden directory on the volume you’re deleting from. Then, you right click on the Trash icon and select “Empty trash”.
This action pops up a small window like this:

osx trash progress window

I grew tired of asking myself what OSX was deleting (the operation can take a while, especially when — as I often do — you’re doing a secure erase) so this ugly one-liner, run as root, will give you the file the OS is working on:


ps auxw | grep -i locum | grep -v grep | awk '{print $2}' | xargs lsof -p | grep -i Trash | awk '{print $9}'

It will output something like this:
/Volumes/FAT80GB/.Trashes/502/xcode3210a432.dmg

You can wrap that command inside the usual while/sleep loop if you want something that keeps you updated on what is going on — or make it an alias for your favourite shell.

Snow Leopard, ssh-agent and an everlasting memory

If you recently switched from an older (pre 10.6) version of OS X to the latest baby, and have the old habit of using ssh to connect around, you may have noticed a singular behaviour: while the older versions always asked you for a passphrase (you have a passphrase set on your private key, right?) the new OS 10.6.x does it just the first time you use it.

Now, no doubt it is handy and user-friendly and automagical and… but I feel it disturbing: if by chance I hand over the laptop to somebody for a quick glance at a web page, for example, she can use it to connect anywhere without my consent — ok, I’m oversimplifying, but you get the idea.

The mistery lies into our old friend ssh-agent: it is spawn using
/System/Library/LaunchAgents/org.openbsd.ssh-agent.plist
[on a single line for yout copying pleasure] as a configuration file and it will cache your passphrase the first time you use ssh.
Up to here it’s fine.

What is troublesome to me is that the default cache time is unlimited (see the man page, this is the default behaviour when it is launched without specifying a “-t” option) therefore it will never forget the passphrase until I logout — being the only user of my laptop, this does not happen often.

Enter the joy of xml configuration files: edit the org.openbsd.ssh-agent.plist, and add the option to your liking, that is change this

<array>
<string>/usr/bin/ssh-agent</string>
<string>-l</string>
</array>

to something like this

<array>
<string>/usr/bin/ssh-agent</string>
<string>-l</string>
<string>-t</string>
<string>120</string>
</array>

if a couple of minutes of “grace period” suit your usage.
Then, just kill the process — it will spawn again the next time you use ssh.

[By the way:
Dear Internet, posting code like the XML up here sucks big time.
It took me more time to format the two snippets to render correctly then writing the whole post.
What do you use to ease this pain?
thank you.]

By continuing to use the site, you agree to the use of cookies. more information

The cookie settings on this website are set to "allow cookies" to give you the best browsing experience possible. If you continue to use this website without changing your cookie settings or you click "Accept" below then you are consenting to this.

Close